Setup Your iTenance Account
Follow this step-by-step guide to configure your iTenance system after registering your account.
Getting Started Overview
After registering your account, you'll need to set up your system with essential configurations. This guide walks you through each step to get your iTenance ready for use.
Pro Tips
- Start small: Create one category, group, unit, and permission set, then expand as needed.
- Plan your structure: Before creating many items, plan your organizational hierarchy.
- Use consistent naming: Use clear, descriptive names to make navigation easier.
- Review permissions regularly: Ensure groups have appropriate access levels for security.
Phase 1: System Configuration (Setup Menu)
Start by configuring the fundamental settings in the Setup menu. These are the building blocks for your entire system.
Tip: You can use the Mass Import feature to quickly add multiple records at once. Just prepare a CSV file with the required data and upload it here.
📍 Access the Setup Menu
Log in to your iTenance account. In the main navigation menu on the top, look for the "Setup" option. Hover over it to expand the Setup menu.
What you'll see: The Setup menu will expand to show options like Categories, Groups, Permissions, and Units.
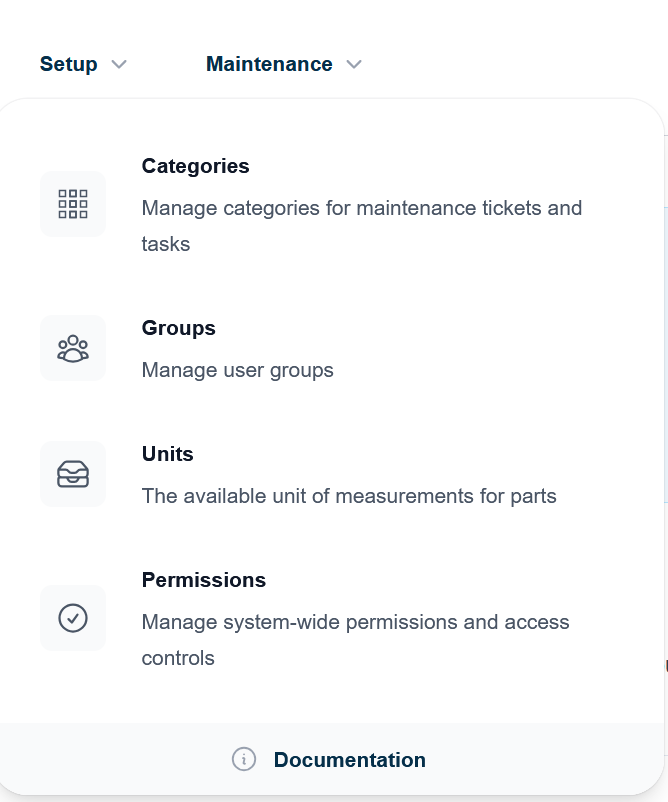
📁 Create Categories
Categories must be created before you can create tickets. Each category requires a type selected from predefined options (Emergency, Breakdown, Inspection, Regular). No default categories exist - you'll create categories that match your organization's workflow.
In the Setup menu, click on "Categories". Click the "Create" button. Enter a descriptive name for your category (e.g., "Preventive Maintenance", "Emergency Repairs", "Hardware"). Optionally add a description. Click "Save".
Step-by-Step:
Common Categories to Create:
Example categories you might create: "Electrical Maintenance" (type: EM), "HVAC Service" (type: RE), "Safety Inspection" (type: IN), "Equipment Repair" (type: BR), "Calibration" (type: RE), "Emergency Response" (type: EM).
👥 Create Groups
Groups define different roles and responsibility areas in your organization. You'll assign users to groups later.
From the Setup menu, click on "Groups". Click the "Create" button. Enter a group name (e.g., "Maintenance Team", "Supervisors", "Operators"). Select a Permission set that matches this group's responsibilities (we'll create permission sets next). Set the group as "Active". Click "Save".
Step-by-Step:
Common Groups to Create:
Examples of groups: Maintenance Team, Supervisors, Operators, Administrators, Quality Inspectors, Logistics Staff.
🔐 Create Permission Sets
Permission sets control what each group can access and do in the system. This determines their level of access to different features.
From the Setup menu, click on "Permissions". Click the "Create" button. Enter a descriptive name (e.g., "Full Access", "Maintenance Only", "Read Only"). Select the appropriate permissions for each module (Locations, Machines, Suppliers, Parts, Units, Settings, Documentation, Reports, Schedule, Manufacturer, Language, Improvements, Status, Group, Category, Premises, Shelf, Inventory, Shift, User, Tickets, Tasks, Inspections, Items, Manifests, Usage, Comments, Activity, Notifications). Set as "Active". Click "Save".
Step-by-Step:
Permission Set Strategy:
Common permission levels: Full Access (view, create, edit, delete everything), Maintenance Access (manage maintenance-related items only), Read Only (view information without making changes), Limited Access (specific areas only).
📏 Create Units of Measurement
Units must be created before you can create Parts. Parts are measured in units, so you need to set up the appropriate units of measurement first (e.g., hours, pieces, kilometers, liters).
From the Setup menu, click on "Units". Click the "Create" button. Enter the unit name (e.g., "Hours", "Pieces", "Kilometers"). Enter a short code for the unit (e.g., "hr", "pc", "km"). Optionally add a description. Set as "Active". Click "Save".
Step-by-Step:
Common Units to Create:
Examples of units: Hours (hr), Pieces (pc), Kilometers (km), Liters (lt), Kilograms (kg), Days (d), Minutes (min).
Phase 2: Organizational Structure (Logistics Section)
Now set up your physical locations and organizational hierarchy in the Logistics section.
🏢 Access the Logistics Section
In the main navigation menu, click on "Logistics". This will open the Logistics dashboard where you can manage your physical infrastructure.
Tip: You'll see "Logistics" in the top navigation. Click it to expand options for Premises, Locations, and more.
🏗️ Understanding Premises
Your first Premises is automatically created when you register your account, using your Company Name as the premises name. A Premises represents a main location or facility and is the top-level organizational unit. All data is scoped to the current premises - you will only see machines, users, units, tickets, locations, and other data that belong to the current premises. You can switch between premises using the premises switcher in the navigation menu.
In the Logistics section, look for "Premises" and click on it. Click the "Create" button. Enter the premises name (e.g., "Main Factory", "Head Office", "Warehouse A"). Enter the address of the premises. Select a currency for financial transactions at this location. Add any notes about the premises (e.g., "Monday-Friday operations"). Click "Save". The system will automatically assign you as the Maintenance Manager.
Step-by-Step:
📍 Create Locations
Locations are areas within your premises. They help organize where your assets are physically located.
In the Logistics section, click on "Locations". Click the "Create" button. Enter a descriptive location name (e.g., "Workshop", "Assembly Line A", "Storage Room 1", "Building B - Floor 3"). Select the Premises this location belongs to. Add any relevant notes or details. Set as "Active". Click "Save".
Step-by-Step:
Location Organization Tips:
Examples of locations: Workshop, Assembly Line A, Assembly Line B, Storage Room 1, Building B - Floor 3, Maintenance Area, Quality Control Lab.
Phase 3: Asset Management (Assets & Related Data)
Set up your assets and supporting information to track all equipment and machinery.
Tip: You can use the Mass Import feature to quickly add multiple records at once. Just prepare a CSV file with the required data and upload it here.
🏭 Create Manufacturers
Manufacturers are the companies that produce your equipment and machines.
In the Assets section, look for "Manufacturers". Click the "Create" button. Enter the manufacturer name (e.g., "Siemens", "Bosch", "ABB"). Add contact information or website if available. Set as "Active". Click "Save".
Step-by-Step:
⚙️ Create Machines
Machines are the individual pieces of equipment you want to manage and maintain.
In the Assets section, click on "Machines". Click the "Create" button. Enter a descriptive machine name (e.g., "CNC Machine 01", "Hydraulic Press A"). Select the location where this machine is located. Select the manufacturer. Enter the machine model and serial number if available. Add specifications (power consumption, dimensions, etc.). Set as "Active". Click "Save".
Step-by-Step:
🚚 Create Suppliers
Suppliers are vendors who provide parts, equipment, or services.
In the Assets section, click on "Suppliers". Click the "Create" button. Enter the supplier name. Add address, contact details, and payment terms if available. Set as "Active". Click "Save".
Step-by-Step:
🔧 Create Parts
Parts are replaceable components used in maintenance and repairs.
In the Assets section, click on "Parts". Click the "Create" button. Enter the part name and description. Assign to a supplier. Set the unit of measurement (you created these earlier). Add part number and cost information. Set as "Active". Click "Save".
Step-by-Step:
Phase 4: Team Management
Create additional user accounts for your team members with appropriate group assignments.
👤 Create Additional Users
As an account administrator, you can add team members to the system and assign them to groups with appropriate permissions.
In the main navigation, look for "Users" or "Team Management". Click on "Users". Click the "Create" or "Add User" button. Enter the user's email address and name. Select the group(s) this user belongs to (e.g., "Maintenance Team", "Supervisors"). Set the account as "Active". The user will receive an email invitation to set their password. Click "Save".
Step-by-Step:
📧 User Invitation Process: After user creation, team members will receive an invitation email. They should click the link to set their password and complete their profile setup.
Next Steps
- Create maintenance schedules for your machines
- Assign tasks to team members
- Track equipment maintenance history from the machine page
- Manage spare parts inventory and link parts to machines
- Set up checklists for recurring inspection tasks
- Create reports on maintenance activities and costs