अपना iTenance खाता सेट करें
अपना खाता पंजीकृत करने के बाद अपने iTenance सिस्टम को कॉन्फ़िगर करने के लिए इस चरण-दर-चरण मार्गदर्शिका का पालन करें।
शुरू करने का अवलोकन
अपना खाता पंजीकृत करने के बाद, आपको आवश्यक कॉन्फ़िगरेशन के साथ अपने सिस्टम को सेट अप करना होगा। यह मार्गदर्शिका आपके iTenance को उपयोग के लिए तैयार करने के लिए प्रत्येक चरण में आपका मार्गदर्शन करती है।
प्रो टिप्स
- छोटे से शुरू करें: एक श्रेणी, समूह, इकाई और अनुमति सेट बनाएँ, फिर आवश्यकतानुसार विस्तार करें।
- अपनी संरचना की योजना बनाएँ: कई आइटम बनाने से पहले, अपने संगठनात्मक पदानुक्रम की योजना बनाएँ।
- सुसंगत नामकरण का उपयोग करें: नेविगेशन को आसान बनाने के लिए स्पष्ट, वर्णनात्मक नामों का उपयोग करें।
- अनुमतियों की नियमित समीक्षा करें: सुनिश्चित करें कि समूहों के पास सुरक्षा के लिए उचित पहुंच स्तर हैं।
चरण 1: सिस्टम कॉन्फ़िगरेशन (सेटअप मेनू)
सेटअप मेनू में मूलभूत सेटिंग्स को कॉन्फ़िगर करके शुरू करें। ये आपके पूरे सिस्टम के लिए बिल्डिंग ब्लॉक्स हैं।
सुझाव: आप एक साथ कई रिकॉर्ड तेज़ी से जोड़ने के लिए थोक आयात सुविधा का उपयोग कर सकते हैं। बस आवश्यक डेटा वाली CSV फ़ाइल तैयार करें और उसे यहाँ अपलोड करें।
📍 सेटअप मेनू तक पहुंचें
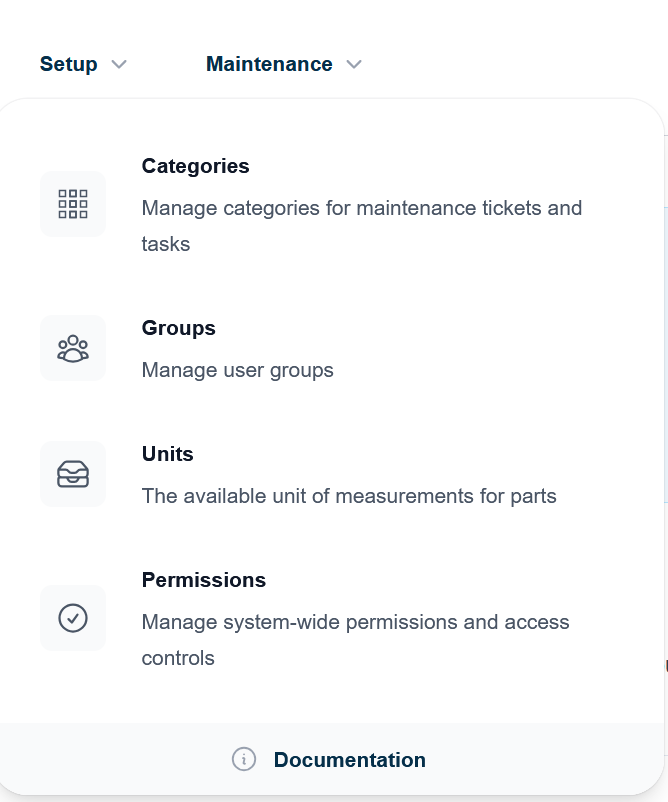
अपने iTenance खाते में लॉग इन करें। शीर्ष पर मुख्य नेविगेशन मेनू में, "सेटअप" विकल्प देखें। सेटअप मेनू का विस्तार करने के लिए उस पर होवर करें।
आप क्या देखेंगे: सेटअप मेनू विस्तारित होकर श्रेणियां, समूह, अनुमतियां और इकाइयां जैसे विकल्प दिखाएगा।
📁 श्रेणियां बनाएँ
कार्य आदेश बनाने से पहले श्रेणियाँ बनाई जानी चाहिए। प्रत्येक श्रेणी के लिए पूर्वनिर्धारित विकल्पों (आपातकालीन, खराबी, निरीक्षण, नियमित) में से एक प्रकार का चयन करना आवश्यक है। कोई डिफ़ॉल्ट श्रेणियाँ मौजूद नहीं हैं - आप अपनी संस्था के कार्यप्रवाह से मेल खाने वाली श्रेणियाँ बनाएँगे।
सेटअप मेनू में, "श्रेणियां" पर क्लिक करें। "बनाएँ" बटन पर क्लिक करें। अपनी श्रेणी के लिए एक वर्णनात्मक नाम दर्ज करें (उदाहरण के लिए, "निवारक रखरखाव", "आपातकालीन मरम्मत", "हार्डवेयर")। वैकल्पिक रूप से एक विवरण जोड़ें। "सहेजें" पर क्लिक करें।
चरण-दर-चरण:
बनाने के लिए सामान्य श्रेणियां:
उदाहरण श्रेणियां जो आप बना सकते हैं: "विद्युत रखरखाव" (प्रकार: EM), "HVAC सेवा" (प्रकार: RE), "सुरक्षा निरीक्षण" (प्रकार: IN), "उपकरण मरम्मत" (प्रकार: BR), "कैलिब्रेशन" (प्रकार: RE), "आपातकालीन प्रतिक्रिया" (प्रकार: EM)।
👥 समूह बनाएँ
समूह आपके संगठन में विभिन्न भूमिकाओं और जिम्मेदारी क्षेत्रों को परिभाषित करते हैं। आप बाद में उपयोगकर्ताओं को समूहों में असाइन करेंगे।
सेटअप मेनू से, "समूह" पर क्लिक करें। "बनाएँ" बटन पर क्लिक करें। एक समूह का नाम दर्ज करें (उदाहरण के लिए, "रखरखाव टीम", "पर्यवेक्षक", "ऑपरेटर")। एक अनुमति सेट चुनें जो इस समूह की जिम्मेदारियों से मेल खाता हो (हम अगले अनुमति सेट बनाएँगे)। समूह को "सक्रिय" के रूप में सेट करें। "सहेजें" पर क्लिक करें।
चरण-दर-चरण:
बनाने के लिए सामान्य समूह:
समूहों के उदाहरण: रखरखाव टीम, पर्यवेक्षक, ऑपरेटर, प्रशासक, गुणवत्ता निरीक्षक, लॉजिस्टिक्स स्टाफ।
🔐 अनुमति सेट बनाएँ
अनुमति सेट नियंत्रित करते हैं कि प्रत्येक समूह सिस्टम में क्या एक्सेस कर सकता है और क्या कर सकता है। यह विभिन्न सुविधाओं तक उनकी पहुंच का स्तर निर्धारित करता है।
सेटअप मेनू से, "अनुमतियाँ" पर क्लिक करें। "बनाएँ" बटन पर क्लिक करें। एक वर्णनात्मक नाम दर्ज करें (उदाहरण के लिए, "पूर्ण पहुँच", "केवल रखरखाव", "केवल पढ़ें")। प्रत्येक मॉड्यूल (स्थान, मशीनें, आपूर्तिकर्ता, पुर्जे, इकाइयाँ, सेटिंग्स, दस्तावेज़ीकरण, रिपोर्ट, अनुसूची, निर्माता, भाषा, सुधार, स्थिति, समूह, श्रेणी, परिसर, शेल्फ, इन्वेंट्री, शिफ्ट, उपयोगकर्ता, कार्य आदेश, कार्य, निरीक्षण, आइटम, मैनिफेस्ट, उपयोग, टिप्पणियाँ, गतिविधि, सूचनाएँ) के लिए उचित अनुमतियाँ चुनें। "सक्रिय" के रूप में सेट करें। "सहेजें" पर क्लिक करें।
चरण-दर-चरण:
अनुमति सेट रणनीति:
सामान्य अनुमति स्तर: पूर्ण एक्सेस (सब कुछ देखें, बनाएँ, संपादित करें, हटाएँ), रखरखाव एक्सेस (केवल रखरखाव-संबंधित आइटम प्रबंधित करें), केवल पढ़ें (परिवर्तन किए बिना जानकारी देखें), सीमित एक्सेस (केवल विशिष्ट क्षेत्र)।
📏 माप की इकाइयाँ बनाएँ
पार्ट्स बनाने से पहले इकाइयाँ बनाना आवश्यक है। पार्ट्स इकाइयों में मापे जाते हैं, इसलिए आपको पहले माप की उचित इकाइयाँ स्थापित करने की आवश्यकता है (उदाहरण के लिए, घंटे, पीस, किलोमीटर, लीटर)।
सेटअप मेनू से, "इकाइयाँ" पर क्लिक करें। "बनाएँ" बटन पर क्लिक करें। इकाई का नाम दर्ज करें (उदाहरण के लिए, "घंटे", "पीस", "किलोमीटर")। इकाई के लिए एक छोटा कोड दर्ज करें (उदाहरण के लिए, "घं.", "पीस", "किमी.")। वैकल्पिक रूप से एक विवरण जोड़ें। "सक्रिय" के रूप में सेट करें। "सेव करें" पर क्लिक करें।
चरण-दर-चरण:
बनाने के लिए सामान्य इकाइयाँ:
इकाइयों के उदाहरण: घंटे (घं.), पीस (पीस), किलोमीटर (किमी.), लीटर (ली.), किलोग्राम (किग्रा.), दिन (दि.), मिनट (मि.).
चरण 2: संगठनात्मक संरचना (लॉजिस्टिक्स अनुभाग)
अब लॉजिस्टिक्स अनुभाग में अपने भौतिक स्थान और संगठनात्मक पदानुक्रम को सेट करें।
🏢 लॉजिस्टिक्स अनुभाग तक पहुँचें
मुख्य नेविगेशन मेनू में, "लॉजिस्टिक्स" पर क्लिक करें। यह लॉजिस्टिक्स डैशबोर्ड खोलेगा जहाँ आप अपनी भौतिक अवसंरचना का प्रबंधन कर सकते हैं।
सुझाव: आपको शीर्ष नेविगेशन में "लॉजिस्टिक्स" दिखाई देगा। परिसर, स्थान और अन्य विकल्पों का विस्तार करने के लिए इस पर क्लिक करें।
🏗️ परिसर को समझना
जब आप अपना खाता पंजीकृत करते हैं, तो आपकी कंपनी का नाम परिसर के नाम के रूप में उपयोग करके आपका पहला परिसर स्वचालित रूप से बनाया जाता है। एक परिसर एक मुख्य स्थान या सुविधा का प्रतिनिधित्व करता है और शीर्ष-स्तरीय संगठनात्मक इकाई है। सभी डेटा वर्तमान परिसर तक सीमित है - आपको केवल मशीनें, उपयोगकर्ता, इकाइयाँ, कार्य आदेश, स्थान और अन्य डेटा दिखाई देंगे जो वर्तमान परिसर से संबंधित हैं। आप नेविगेशन मेनू में परिसर स्विचर का उपयोग करके परिसरों के बीच स्विच कर सकते हैं।
लॉजिस्टिक्स अनुभाग में, "परिसर" खोजें और उस पर क्लिक करें। "बनाएँ" बटन पर क्लिक करें। परिसर का नाम दर्ज करें (उदाहरण के लिए, "मुख्य कारखाना", "प्रधान कार्यालय", "गोदाम ए")। परिसर का पता दर्ज करें। इस स्थान पर वित्तीय लेनदेन के लिए एक मुद्रा चुनें। परिसर के बारे में कोई भी नोट जोड़ें (उदाहरण के लिए, "सोमवार-शुक्रवार संचालन")। "सेव करें" पर क्लिक करें। सिस्टम आपको स्वचालित रूप से रखरखाव प्रबंधक के रूप में असाइन करेगा।
चरण-दर-चरण:
📍 स्थान बनाएँ
स्थान आपके परिसर के भीतर के क्षेत्र हैं। वे आपके संपत्तियों के भौतिक रूप से स्थित होने को व्यवस्थित करने में मदद करते हैं।
लॉजिस्टिक्स अनुभाग में, "स्थान" पर क्लिक करें। "बनाएँ" बटन पर क्लिक करें। एक वर्णनात्मक स्थान नाम दर्ज करें (उदाहरण के लिए, "वर्कशॉप", "असेंबली लाइन ए", "स्टोरेज रूम 1", "बिल्डिंग बी - तीसरी मंजिल")। वह परिसर चुनें जिससे यह स्थान संबंधित है। कोई भी प्रासंगिक नोट या विवरण जोड़ें। "सक्रिय" के रूप में सेट करें। "सेव करें" पर क्लिक करें।
चरण-दर-चरण:
स्थान संगठन युक्तियाँ:
स्थान के उदाहरण: कार्यशाला, असेंबली लाइन A, असेंबली लाइन B, भंडार कक्ष 1, भवन B - तीसरी मंज़िल, रखरखाव क्षेत्र, गुणवत्ता नियंत्रण लैब।
चरण 3: परिसंपत्ति प्रबंधन (परिसंपत्तियाँ और संबंधित डेटा)
सभी उपकरण और मशीनरी को ट्रैक करने के लिए अपनी परिसंपत्तियों और सहायक जानकारी को सेट करें।
सुझाव: आप एक साथ कई रिकॉर्ड तेज़ी से जोड़ने के लिए थोक आयात सुविधा का उपयोग कर सकते हैं। बस आवश्यक डेटा वाली CSV फ़ाइल तैयार करें और उसे यहाँ अपलोड करें।
🏭 निर्माता बनाएँ
निर्माता वे कंपनियाँ हैं जो आपके उपकरण और मशीनें बनाती हैं।
परिसंपत्ति अनुभाग में, "निर्माता" खोजें। "बनाएँ" बटन पर क्लिक करें। निर्माता का नाम दर्ज करें (जैसे, "Siemens", "Bosch", "ABB")। यदि उपलब्ध हो तो संपर्क जानकारी या वेबसाइट जोड़ें। "सक्रिय" के रूप में सेट करें। "सहेजें" पर क्लिक करें।
चरण-दर-चरण:
⚙️ मशीनें बनाएँ
मशीनें उपकरण के वे व्यक्तिगत टुकड़े हैं जिन्हें आप प्रबंधित और रखरखाव करना चाहते हैं।
परिसंपत्ति अनुभाग में, "मशीनें" पर क्लिक करें। "बनाएँ" बटन पर क्लिक करें। एक वर्णनात्मक मशीन नाम दर्ज करें (जैसे, "CNC Machine 01", "Hydraulic Press A")। वह स्थान चुनें जहाँ यह मशीन स्थित है। निर्माता चुनें। यदि उपलब्ध हो तो मशीन का मॉडल और सीरियल नंबर दर्ज करें। विनिर्देश जोड़ें (बिजली की खपत, आयाम, आदि)। "सक्रिय" के रूप में सेट करें। "सहेजें" पर क्लिक करें।
चरण-दर-चरण:
🚚 आपूर्तिकर्ता बनाएँ
आपूर्तिकर्ता वे विक्रेता हैं जो पुर्जे, उपकरण या सेवाएँ प्रदान करते हैं।
परिसंपत्ति अनुभाग में, "आपूर्तिकर्ता" पर क्लिक करें। "बनाएँ" बटन पर क्लिक करें। आपूर्तिकर्ता का नाम दर्ज करें। यदि उपलब्ध हो तो पता, संपर्क विवरण और भुगतान शर्तें जोड़ें। "सक्रिय" के रूप में सेट करें। "सहेजें" पर क्लिक करें।
चरण-दर-चरण:
🔧 पुर्जे बनाएँ
पुर्जे रखरखाव और मरम्मत में उपयोग होने वाले बदली जाने वाले घटक हैं।
परिसंपत्ति अनुभाग में, "पुर्जे" पर क्लिक करें। "बनाएँ" बटन पर क्लिक करें। पुर्जे का नाम और विवरण दर्ज करें। एक आपूर्तिकर्ता को असाइन करें। माप की इकाई सेट करें (आपने इन्हें पहले बनाया था)। पार्ट नंबर और लागत जानकारी जोड़ें। "सक्रिय" के रूप में सेट करें। "सहेजें" पर क्लिक करें।
चरण-दर-चरण:
चरण 4: टीम प्रबंधन
अपनी टीम के सदस्यों के लिए उचित समूह असाइनमेंट के साथ अतिरिक्त उपयोगकर्ता खाते बनाएँ।
👤 अतिरिक्त उपयोगकर्ता बनाएँ
एक खाता व्यवस्थापक के रूप में, आप सिस्टम में टीम के सदस्यों को जोड़ सकते हैं और उन्हें उचित अनुमतियों के साथ समूहों को असाइन कर सकते हैं।
मुख्य नेविगेशन में, "उपयोगकर्ता" या "टीम प्रबंधन" खोजें। "उपयोगकर्ता" पर क्लिक करें। "बनाएँ" या "उपयोगकर्ता जोड़ें" बटन पर क्लिक करें। उपयोगकर्ता का ईमेल पता और नाम दर्ज करें। वह समूह (समूहों) चुनें जिससे यह उपयोगकर्ता संबंधित है (उदाहरण के लिए, "रखरखाव टीम", "पर्यवेक्षक")। खाते को "एक्टिव" के रूप में सेट करें। उपयोगकर्ता को अपना पासवर्ड सेट करने के लिए एक ईमेल आमंत्रण प्राप्त होगा। "सेव करें" पर क्लिक करें।
चरण-दर-चरण:
📧 उपयोगकर्ता आमंत्रण प्रक्रिया: उपयोगकर्ता बनाने के बाद, टीम के सदस्यों को एक आमंत्रण ईमेल प्राप्त होगा। उन्हें अपना पासवर्ड सेट करने और अपनी प्रोफ़ाइल सेटअप पूरा करने के लिए लिंक पर क्लिक करना चाहिए।
अगले चरण
- अपनी मशीनों के लिए रखरखाव शेड्यूल बनाएँ
- टीम के सदस्यों को कार्य असाइन करें
- मशीन पेज से उपकरण रखरखाव इतिहास को ट्रैक करें
- स्पेयर पार्ट्स इन्वेंट्री का प्रबंधन करें और पार्ट्स को मशीनों से लिंक करें
- आवर्ती निरीक्षण कार्यों के लिए चेकलिस्ट सेट करें
- रखरखाव गतिविधियों और लागतों पर रिपोर्ट बनाएँ